Simulating Azure Active Directory Application Authentication flows using PowerShell - openid connect and form_post
It can be useful to simulate or test the various Azure Active Directory Authentication flows, in this post I outline the steps which you can follow to test out any flows where you have set the response_mode to form_post.


It can be useful to simulate or test the various Azure Active Directory Authentication flows, in this post I outline the steps which you can follow to test out any flows where you have set the response_mode to form_post. I am aware that we could also leverage Postman or Fiddler to manually create the require HTTP Requests.

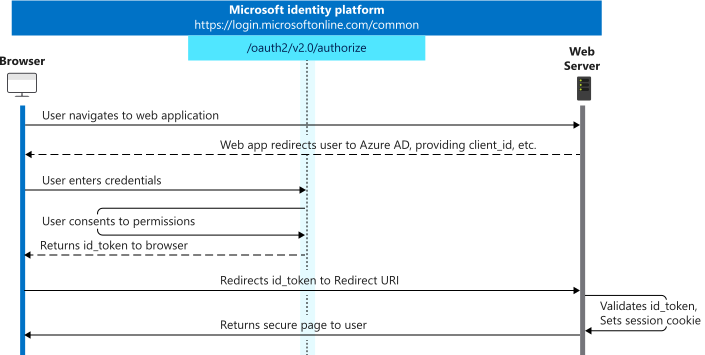
The simplest flow to demonstrate this strategy is using the openid connect protocol, below we can see a diagram from the official Microsoft documentation which outlines the various steps which occur during authentication.
Azure Active Directory Application Registration
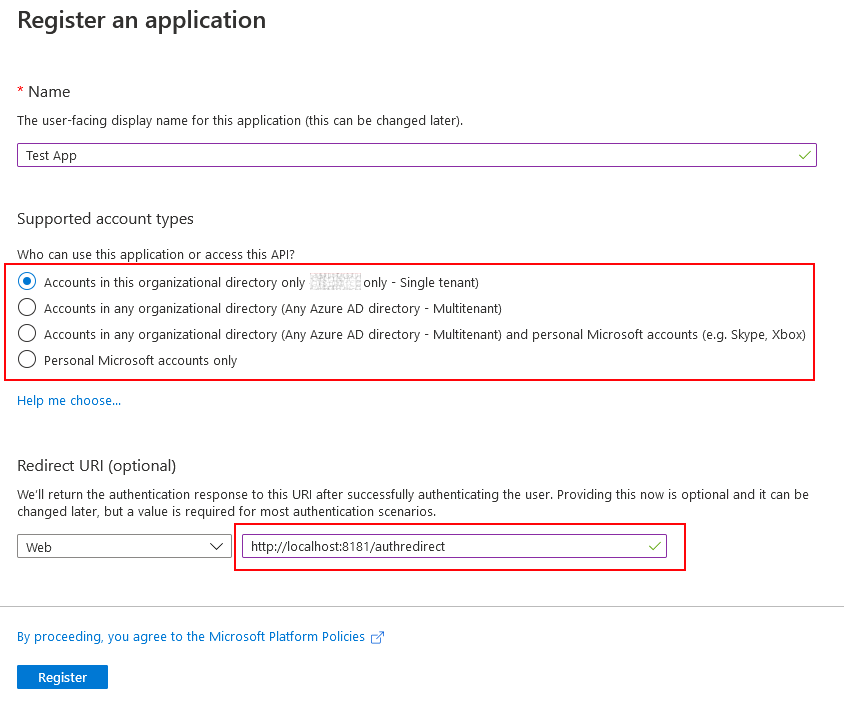
If you don't already have a AAD Application Registration follow the steps below to create one which you can test with.
In the Azure Active Directory blade within the Azure Portal, navigate to App registrations -> New registration. Configure the application according to the screenshot below
- Single Tenant Application
- Web Redirect URI with value "http://localhost:8181/authredirect"
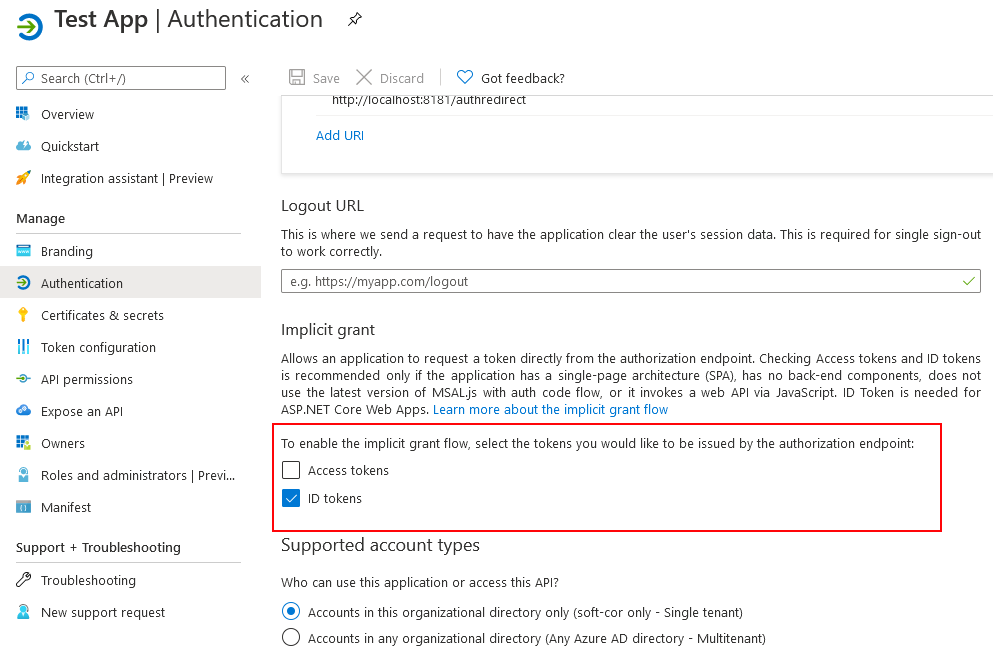
Go to the Authentication blade for the newly created Application Registration, and enable "ID tokens"
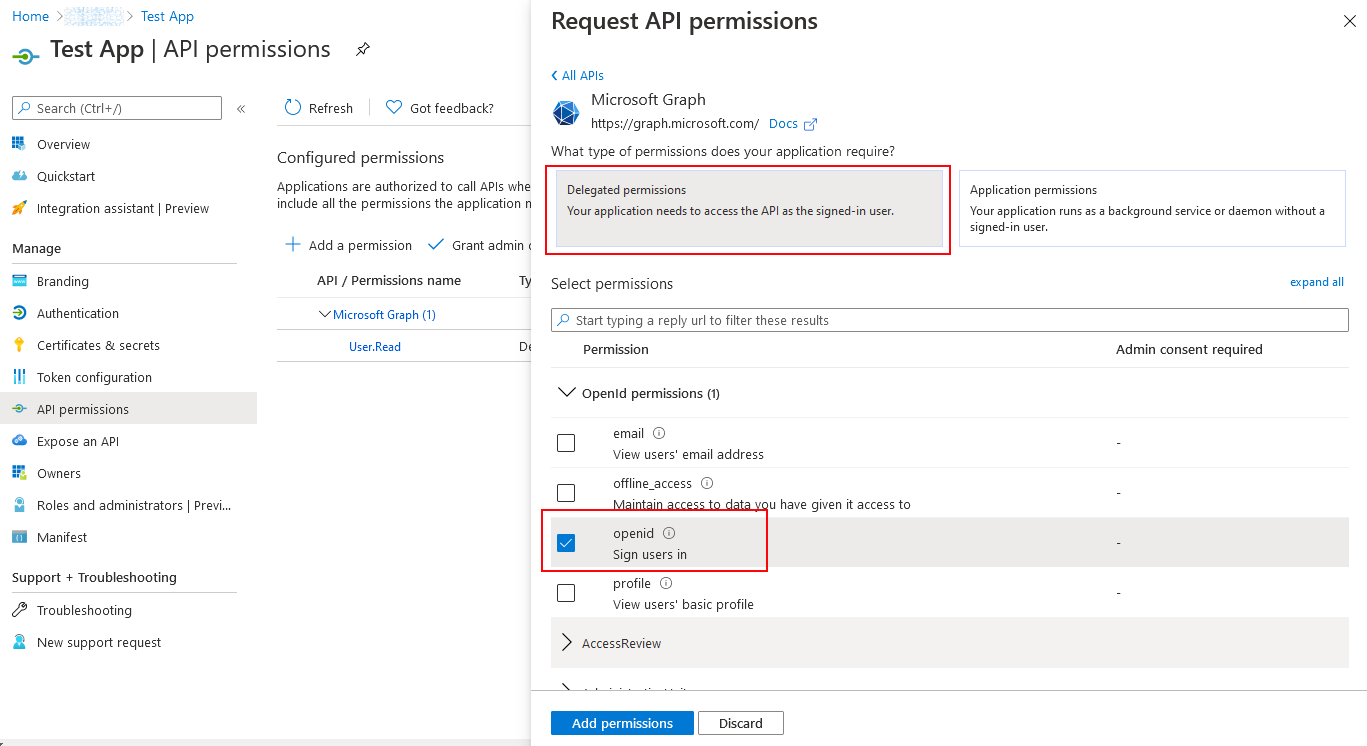
As we will be testing the openid connect protocol add the openid delegated API permission.
Simulate the authentication flow
To simulate the authentication flow described above I wrote a simple PowerShell script. I based this script on an example for standing up a local webserver leveraging PowerShell. I adapted the sample to listen for a HTTP Post from Azure Active Directory which contains the Token Payload, in this case the id_token.
Add-Type -AssemblyName System.Web

# Sample for running WebServer in PS - https://gist.github.com/19WAS85/5424431
$webserver = Start-Job -Name WebServer -ScriptBlock {
    $http = [System.Net.HttpListener]::new()
    $http.Prefixes.Add("http://localhost:8181/")
    $http.Start()
    if ($http.IsListening) {
        write-host " HTTP Server Ready!  " -f 'black' -b 'gre'
        write-host "To stop WebServer go to $($http.Prefixes)stop" -f 'y'
        write-host "Listening for HTTP POST on $($http.Prefixes)step2_api1" -f 'y'
    }
    while ($http.IsListening) {

        # Get Request Url
        # When a request is made in a web browser the GetContext() method will return a request object
        # Our route examples below will use the request object properties to decide how to respond
        $context = $http.GetContext()

        # ROUTE - http://localhost:8181/stop'
        if ($context.Request.HttpMethod -eq 'GET' -and $context.Request.RawUrl -eq '/stop') {

            # We can log the request to the terminal
            write-host "$($context.Request.UserHostAddress)  =>  $($context.Request.Url)" -f 'mag'

            # the html/data you want to send to the browser
            [string]$html = "<h1>Stopping Webserver</h1>"

            #resposed to the request
            $buffer = [System.Text.Encoding]::UTF8.GetBytes($html) # convert htmtl to bytes
            $context.Response.ContentLength64 = $buffer.Length
            $context.Response.OutputStream.Write($buffer, 0, $buffer.Length) #stream to broswer
            $context.Response.OutputStream.Close() # close the response

            return

        }

        # ROUTE - http://localhost:8181/authredirect'
        if ($context.Request.HttpMethod -eq 'POST' -and $context.Request.RawUrl -eq '/authredirect') {

            # decode the form post
            # html form members need 'name' attributes as in the example!
            $FormContent = [System.IO.StreamReader]::new($context.Request.InputStream).ReadToEnd()

            # We can log the request to the terminal
            write-host "$($context.Request.UserHostAddress)  =>  $($context.Request.Url)" -f 'mag'
            Write-Host $FormContent -f 'Green'

            $ht = @{}
            $FormContent.Split('&') | ForEach-Object {
                $key,$value = $_.Split('=')
                $ht[$key] = $value
            }

            $context.Response.StatusCode = 200
            $context.Response.Close()

            return $ht.id_token
        }
    }
}
To kick off the authentication flow our script will additionally output the url which can be pasted into your favorite browser, before doing this make sure to substitute your application registration details.
# https://docs.microsoft.com/en-us/azure/active-directory/develop/v2-protocols-oidc
# Parameters
$tenant_id = "[AAD_TENANT_ID]"
$clientId = "[AAD_CLIENT_ID]"
$redirect_uri = "http://localhost:8181/authredirect"
$scope = "openid"

# Request IdToken
Write-Host "Open browser and navigate to - 'https://login.microsoftonline.com/$tenant_id/oauth2/v2.0/authorize?client_id=$clientId&response_type=id_token&redirect_uri=$([System.Web.HttpUtility]::UrlEncode($redirect_uri))&response_mode=form_post&scope=$([System.Web.HttpUtility]::UrlEncode($scope))&state=12345&nonce=678910'"

# Read the returned idtoken
$idToken  = $webserver | Receive-Job -AutoRemoveJob -Wait

# Output to console
Write-Host "idToken = $idToken"
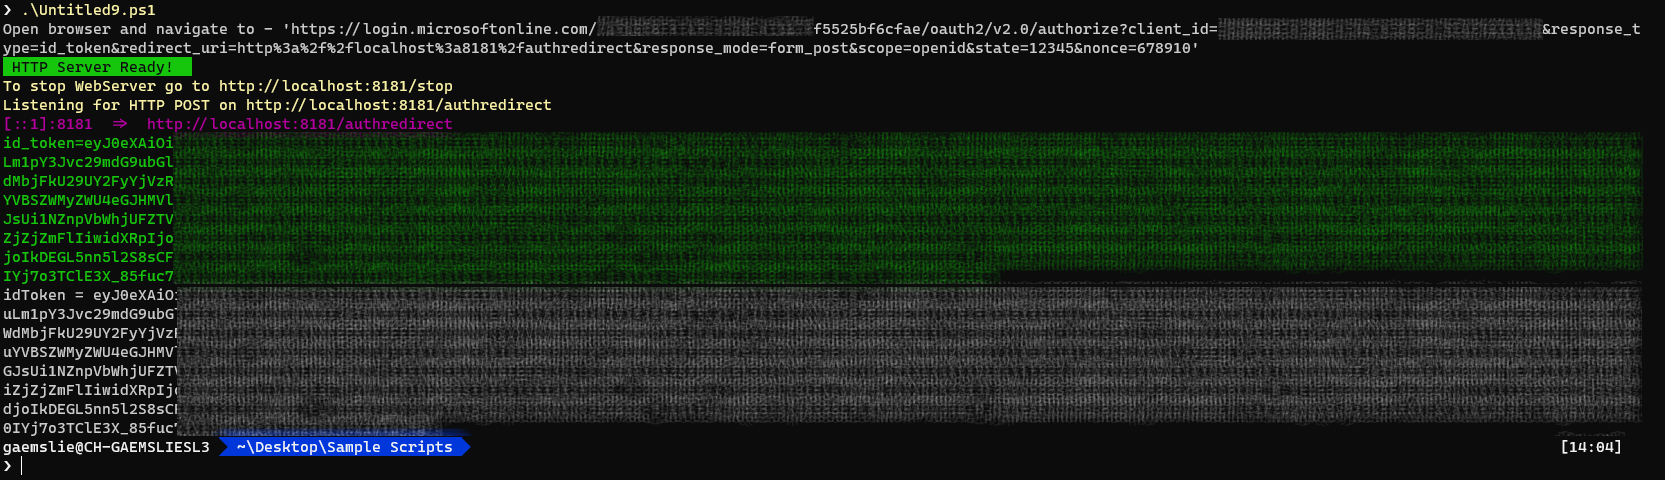
If we run the script, we will see the following output.

When you navigate to the URL which is output to the PowerShell console, you will be required to login and you will also be prompted for consent.

Once you have successfully authenticated and accepted the consent request you should see the following output in the PowerShell console.
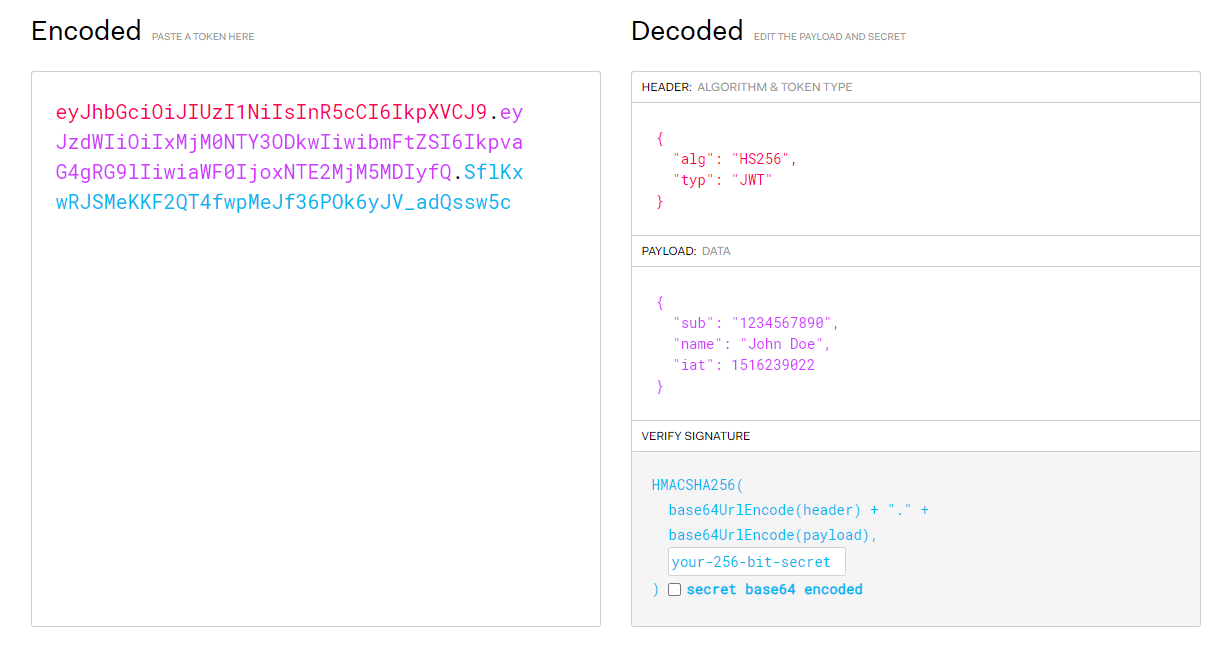
You can use a tool which you trust like http://jwt.io to decode the token.
Hope this strategy is useful for someone else!